These UK Road Signs have been made specifically for Architectural Visualisations for big developments.
Large and complex spaces is where Unreal Engine can really shine with it's fast workflow and powerful rendering. Helping developers, architects, local authorities and the public to really visualise the impact, opportunities and (hopefully) beauty of proposed schemes. As part of the design these signs have a relatively small memory and rendering overhead while being attractive and quick to implement, leaving you more time and resource for the important architecture and landscaping.
- They are quick and easy to use
- They have a small memory and resource footprint as their main use case is on large projects
- They are not 100% physically accurate but are an iconic representation of the intent of roads and routes in a simulation to illustrate intent
- They are realistic looking enough to not jar against common Real Time Visualisation (RTV) styling

Uk road sign images are owned by the UK Government and can be used according to the Open Government Licence Version 3.
If you want to know more about UK road signs and how they are used, a good starting place is Traffic Sign Images. From here you can access all the rules for proper road sign use in the UK and pretty much anything you may need to know about the subject of UK roads.
Lastly, if you have a requirement for 100% physically accurate digital or real-time UK signs, roads or street furniture that adhere to UK highways regulations and building standards please get in touch.
Using the Signs
UK Road Signs are accessed via four Blueprints: a single sign; wall sign; signs on a post and signs on a roadworks frame.
The main blueprint is Sign_single which includes all the functions for setting up a sign. The other Blueprints add on a few extra instructions to deal with moving the signs around in relation to each other.

Using Sign_single
The single sign is intended to be wall mounted and the pivot-point/origin sits just behind the sign so it will easily snap to walls that use the UE4 grid. The meshes actually sit just off the grid so the sign gains a strong shadow or ambient occlusion to avoid looking like its floating. Also this leaves a logical space where a wall bracket would go.

The sign mesh is a little fat compared to a real sign, this is to reduce z-fighting at distances and also to reduce aliasing artefacts when the sign is edge-on.

When you first place the sign in the world from the Content Browser an arrow showing which way the sign is facing and a yellow bordered warning sign are shown until you choose a proper sign face. This is not a real uk road sign its a "Warning you haven't chosen a sign yet" sign.

The details panel allow you to tweak the appearance of the sign and choose what sign face is shown.
Sign Condition

The default condition is "new" which is pristine and shiny. The other conditions are for the odd occasions where a sign is drawing undue attention to itself and needs to bed into the environs more effectively. Signs around existing developments can get quite faded so the "Faded" conditions can help differentiate new from old.
The "game" options are for game use, these introduce an alternate 4k texture for the sign faces so using these conditions alongside other conditions doubles your sign texture use. If you are developing a game in which you intend to use these signs we suggest you read the Game Development section below.
Shine

The shine setting alters how much the sign glows when you face it. Its not a light based effect, its based on the direction you are looking at the sign compared to the signs direction. If you stand directly in front of the sign it will be at it's brightest. In some lighting conditions an unlit sign looks too dim so this brightens signs so they look more accurate.
Sign Face Selection

The drop down list can hold 256 entries so we've split the signs into two dropdowns. Each sign face has its own section in the Detail Panel. You can see that Condition and shine are universal to the whole sign and that Sign Face and Size are specific to each sign.
Sign Size

Uk round and triangular signs adhere to set sizes depending on how fast traffic approaches, the faster the speed of approach, the bigger the sign. All the signs can have their sizes changed according to this same formula and although its not physically accurate for the other types of signs its fairly close. If you need to further adjust sign sizes you can select the component by clicking on it twice after selecting the element and adjusting its scale transform manually.
Other Sign Blueprints
All other sign blueprints have two or more signs as its very common for UK road signs to have a symbol sign with a word sign underneath.
Position & Gap

The Position is the gap between the top of the post or frame and the top of the topmost sign. As UK sign positions use trigonometry to place signs at specific legal heights and poles come in standard heights and are then buried into holes in the ground, signs and poles often differ in where they thier top is.
The Gap is the gap between the bottom of the topmost sign and the top of the bottom sign. The default is 10cm which should be fine for most cases.
In addition to the size and gap, smaller signs are often on smaller poles so simply bury the pole in the floor to get the desired height.
All 400+ Signs


Game Development
This section is intended for you if you're looking to use these signs in a game or want to extend the options the blueprints offer. First we'll discuss the way we made the sign assets then we'll show you the workflow we used to change each type of asset smoothly.
We have made these signs primarily for Arch Vis but we know that if you are making a game and use these assets you will likely want to tweak them to fit your existing style. As the data is all held in spreadsheets it is really easy for non-artists to edit these files. Also we haven't added any fun or novelty signs, this is also something you may want to correct for use in a game.
Data Driven Blueprints
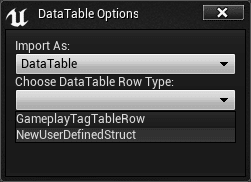
The sign data for the individual signs are held in *.CSV files (UE4 link to Data Driven gameplay), we found this was the simplest way to work with a large data set in Blueprints. The method we used for making these *.CSV files from scratch is in this Blog post.

Meshes
You'll find all the meshes in Content > ukRoadSigns > meshes. Due to the way uk road signs are designed based of the font's x height each sign is a slightly different size however the round and triangular ones are always the same size. For the round and triangular signs we use a number designation so we can have reversed and flipped signs, this allows us to make the most of our texture space for the sign icons.
Round and Triangle sign number designations:
- SM_xxxx1_LOD0 is UV mapped top left to bottom right, 0 to 1 as normal and with a border
- SM_xxxx2_LOD0 is horizontally flipped with a border
- SM_xxxx3_LOD0 is vertically flipped with a border
- SM_xxxx4_LOD0 is horizontally and vertically flipped with a border
- SM_xxxx5_LOD0 is UV mapped normally without a border
- SM_xxxx6_LOD0 is horizontally flipped without a border
- SM_xxxx7_LOD0 is vertically flipped without a border
- SM_xxxx8_LOD0 is horizontally and vertically flipped without a border
Only the designations used are present so neither round or triangular signs use all 8 mesh variations.
None of the square sign meshes use this, they are all individual and mapped normally. The square meshes used for each sign can be found in the ukRoadSignsData DataTable.
We have used up to 6 UV channels to control the masking and graphics on the signs. here is a list of the UV channels:
- (0) Sign face. In ukRoadSignsData Datatable we move the UV's of this channel around the T_signFaces_m texture
- (1) Light map channel
- (2) Mask the back/unprinted from the front/face of the sign. This refers to the T_borderBasic_m texture
- (3) Coordinates for the overlay dirt textures
- (4) Coordinates for the detail textures. This only includes T_reflectiveDetail_n
- (5) This for the border of round and triangular signs. This is most easily seen on the T_borderDamaged_m texture.
Textures
All the textures can be found in Content > ukRoadSigns > textures:

- blank is used by M_Master_simple material to fill texture slots when a texture is not required
- blank_nrm is used by M_Master_simple material to fill normal texture slots when a normal texture is not required
- T_bracket_ao is the ambient occlusion map for the bracket which visually attaches signs to poles, its added to the diffuse in the material
- T_bracket2_ao This is an alternate AO/color map used for the Game-style bright frame
- T_bracket3_ao This is an alternate AO/rust map used for the Game-style frames
- T_frame_ao is the ambient occlusion map for the roadworks frame. Added to the diffuse in the material
- T_frame_n is the normal map for the roadworks frame
- T_frame_Alt_m is for the frame roughness to distinguish between the sandbags and the metal. For dirtier (less reflective) versions this can be dispensed with in favour of a grunge map
- T_poleCracks_MT is a mask for the pole and frame models which adds wear and tear via the metallic channel
- T_poleCracks_n is a normal map for the pole model which adds wear and tear via the normal channel
- T_reflectiveDetail_n is a normal map that simulates the retro reflective material and is present as default on all signs
- T_weathering01_bc is the diffuse and roughness mask for general weathering
- T_weathering02_bc is the diffuse and roughness mask for heavy dirty weathering
These next pair of textures are used to mask in the front faces of the signs. The masks have been packed into each of the RGBA channels then in the blueprint each mask channel is assigned a colour from the limited palette of sign colours to composite each sign face.
- T_signFaces_mThis is the main mask for all the sign faces
- T_signFacesDamaged_mThis is an alternate mask for all the sign faces for the "dilapidated" settings on the "Condition" drop down.
The next set of textures are used to mask the back from the front of the signs and mask in borders on triangular and circular signs.
- T_borderAged_m adds small cracks or bumps around the edges of the sign faces
- T_borderBasic_m is the clean/new version of this mask and forms the basis for the other two
- T_borderDamaged_m adds significant scuffing around the sign edges as well as breaking up and fading borders
Materials
All the materials can be found in Content > ukRoadSigns > materials:

The materials on the sign faces are all dynamic instances of M_master_signsHi made in the Blueprints from material data held in the dataTables. This material is closely linked to the Blueprints and is not easily changed as the whole system relies on colour masking around this material.
- M_master_simple is the base for the pole and frame
The materials below are used "as is" on the pole, frame and brackets. In the "condition" DataTable these materials (and the meshes) can be easily swapped for alternatives.
- MI_pole_xxxx All the pole material instances for the different pole conditions
- MI_frame_xxxx All the frame material instances for the different frame conditions
These material are used in the demonstration map to simply color the environment.
- MI_sample_xxxx All the material instances for BSP volumes on the example map
The materials at the end of the list are all for material development and are not used directly. In the "Material Development" map these materials are assigned to raw assets to develop the material parameters and colors that are then added to the "condition" DataTable to be used for the sign faces.
- MI_SigFace_xxxx Material and color development materials.

Blueprint Additional Files
All the supporting files can be found in Content > ukRoadSigns > blueprints alongside the blueprints.

Dealing with a large number of assets is cumbersome and memory hungry as there are so many signs. To deal with this most of the sign data is held in *.CSV files which we make up in Excel, import into UE4 as DataTables then use Blueprints to generate finished assets. We've written a blog post about how we do this *here*.
To edit the signs in any way you'll need to start with the DataTable files. There are 4 Datatables:
- ukRoadSignConditionData This is how the sign looks. This holds the condition of the sign and color of the sign per condition. Edit this DataTable of you want to change how dirty the signs get; swap in different masks to make them more beaten up or want to change the RGB of each sign color. Unless you want to change the signs themselves this holds almost all the data about how the sign looks.
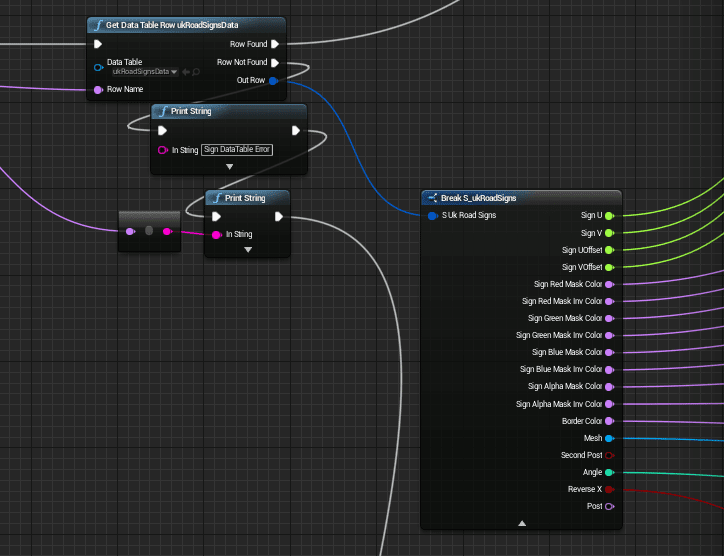
- ukRoadSignsData This is the sign symbol/writing. This is the data for the sign face so if you swap in your own sign faces this is the file to edit. The colors used on the signs, you will see are named, this refers back to the Condition (above) where the names colors are specified as RGB values. Other values are UV coordinates and the mesh to us as well as if the sign is angled or flipped.
- ukRoadSignShineData This just holds the material shine value. It's only in a DataTable for consistency as it only holds a single set of values.
- ukRoadSignBracketData For the list of bracket objects for the back of the signs on the post.
Blueprints
We hope the sign Blueprints themselves are easy enough for you to follow with enough comments where you need them. Please engage us on the Epic forums if you have any questions **Add Link to thread here**. We'll add to this section or the FAQ section as we get feedback from the community.
FAQ
Are there LOD versions of the meshes? The meshes I can see are all postfixed with "LOD0".
No. We did look at LOD but decided that saving memory and draw calls was more important than saving polys as modern integrated graphics and some OEM graphics cards are more likely to be memory starved or have a low CPU-to-GFX transfer speed than struggle with rendering.
Will you make changes to this asset set in the future?
Yes. Obviously any bugs we discover or are reported to us will be fixed in a timely manner. If the community and/or Epic suggest a tweak that could improve the objective of the asset set we'll make changes (see objectives above). In addition we have made these assets because we use them ourselves in our work so if we find them lacking we'll introduce updates.
What about other street furniture? The roadworks sign on its own is a little thin on the ground.
Agreed. We looked at adding traffic lights, road cones and other items but the amount of work on the set would have ballooned which would have put the price up as well as move the focus from Arch Vis Signs, I doubt many Arch Vis scenes would look more beautiful with roadworks outside the window! We actually only expect the Sign-on-the-post to really get much use.